Import/Export of Workitems from Excel in Azure DevOps
Instead of adding multiple Workitems via Azure Boards, you can also import them via Excel by following the steps as shown below. The process is very easy when there is a need to add or update multiple workitems which are children of one another. Before you can start, the Azure DevOps Office Integration needs to be installed so that you can connect to Azure DevOps via Team Tab in Microsoft Excel
Step 1: Open Microsoft Excel and click on Teams tab
Step 2: Click on NewList in the Teams tab as shown

Step 3: Click on Servers button in the below popup

Step 4: Click on Add in the next popup and then add the Azure DevOps or the AzureDevOps server as shown below and then click on the Ok button

Step 5: Once the Ok button is clicked, Sign in with your email address and password in the Microsoft authentication popup, Once the sign-in is successful, Azure DevOps instance would be added as shown below

Step 6: List of Projects would be displayed as shown, then click on the Team Project for which you need to import or export the workitems

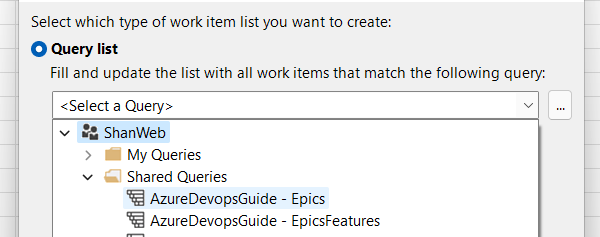
Step 7: Then select the query that would be displayed in the Excel. If it’s a tree query then it would be displayed in the excel as tree of workitems and then click on the Ok button
Step 8: Once the Ok button is clicked, the results would be populated from Azure DevOps as shown

The corresponding list would be displayed in Azure DevOps as shown below. Incase if you want to add tasks to it, that would be displayed in the 4th column (Title4)

The fields displayed here again can be modified by using the Choose Columns option at the top as shown

Clicking on Choose Columns would display another popup as shown below. Here we can select the WorkItem Type to select the Feature, Epics or UserStories which would display the list of all fields. Incase if you want to add some field as column, select the field and click on the “>” symbol between left and right pane, this would add the selected field as column in the right pane which would be then displayed in the excel. Incase if you want to remove some field from the excel, then click on “<” from the selected columns which would be removed from the excel fields

Example: Incase if you want to add Assigned to, select the Assigned to and then click on “>” symbol and then click on “OK” button at the bottom. This would display Assigned to field as one of the columns as shown below

Updating WorkItems from Excel:
To update workitems from Excel, just update any of the columns for any of the workitems and then click on Publish at the top. In the below example, I am doing to change the status of 4071 Product Backlog Item to “Done” and click on the Publish button. Once the publish button is clicked the changes would be published to Azure DevOps as shown below

The changes one published can be also seen in Azure DevOps as shown below

By the above steps, we can either update a single workitem or multiple workitems at the same time from Excel instead of updating workitems one by one from Azure DevOps.

Adding new WorkItems from Excel:
New Workitems also can be easily added to Azure DevOps from excel, this would allow easy addition of Multiple workitems which can’t be done from Azure DevOps UI and in addition to that it’s much easier to add Child workitems from Excel as shown below. Let us say you want to add new task to Excel Plugin installation UserStory or Product Backlog them, then click on Add Child button at the top as shown

Enter the title name of the task and also choose the WorkItem Type as “Task”, then click on the Publish button at the top. Once the Publish button is clicked, the task workitem would be added to the Product Backlog item “Excel Plugin installation” as shown. Once published, you would be able to see the workitem id at the extreme left as shown below and it would be also visible in Azure DevOps UI


By using the above steps, one or more backlog items can be added to Azure DevOps in a very easiest way.
