Automating Azure DevOps Agent Setup
Azure DevOps agents are the backbones of CI/CD process as every build or release definition needs an agent machine to run on. But process of setting up an SelfHosted Azure DevOps agent is manual and cubersome. Sometimes it might take nearly 5 to 10 minutes to setup a Self Hosted interactive agent. So let us see how to automate the process of Azure DevOps Agent Setup using other agents (This would be more helpful when you need to setup agents for Automating or Performance Testing)
PreRequisites: You might need Administrator access to the machine in which you are trying to setup the agent. This is because you need to connect to the target machine to run the agent setup commands.If you are trying to setup an interactive agent, then you need the user account in which the interactive agent should run.
Our Plan is to download the agent zip file and upload it to a repository. Then copy the agent zip file to repository, extract it and run the config.cmd with necessary parameters to configure the agent as a autologon agent or as an service. (The other way is to directly download the agent file from Azure DevOps).But we are choosing

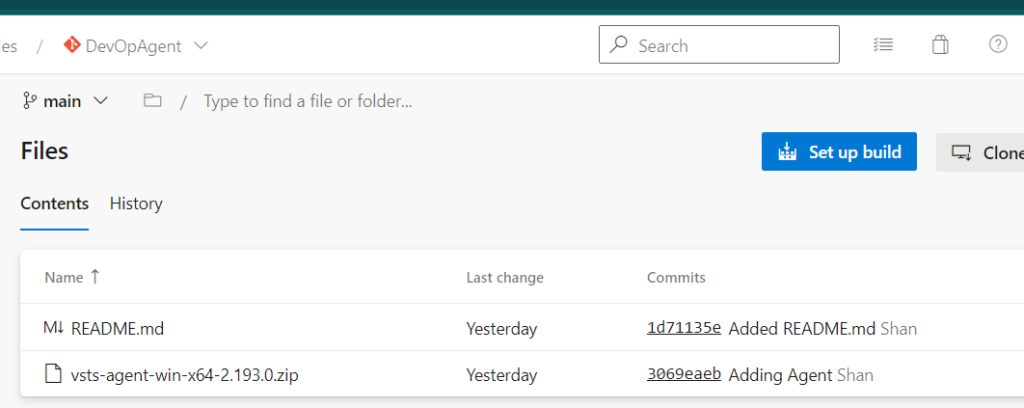
Agent Repository: I have created a agent Repository called “DevOpsAgent” and where I have uploaded the latest version of the agent zip file as shown below

Build Definition for Setting up the Agent:
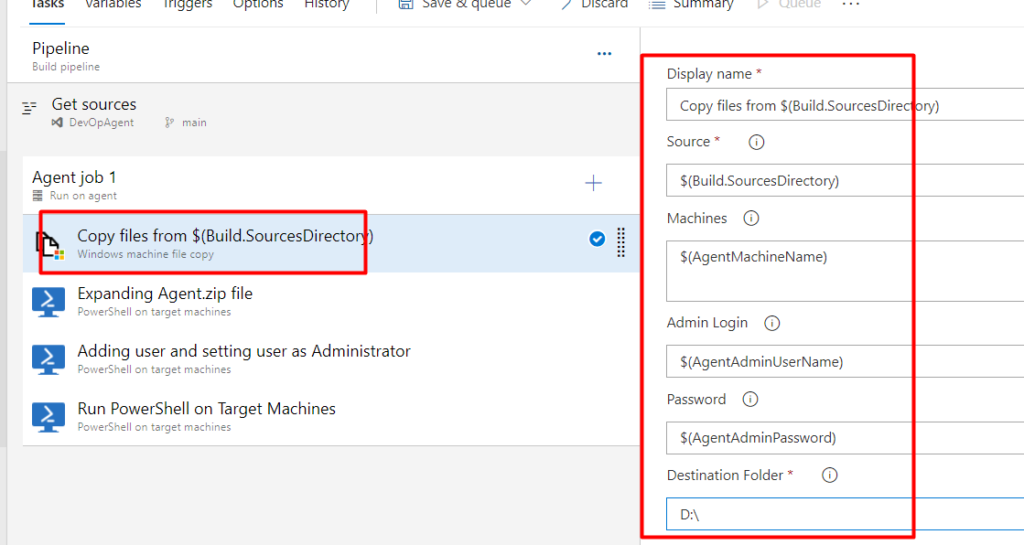
Steps 1: Create a new build definition process called “DevOps Agent Setup” and the build definition would look something similar like here

Let us see the tasks one by one and why each task is needed.
Step 2: Add the task “Windows Machine File Copy” (This is needed because we are going to copy the files from the current agent machine to the agent where we are going to set up the agent)

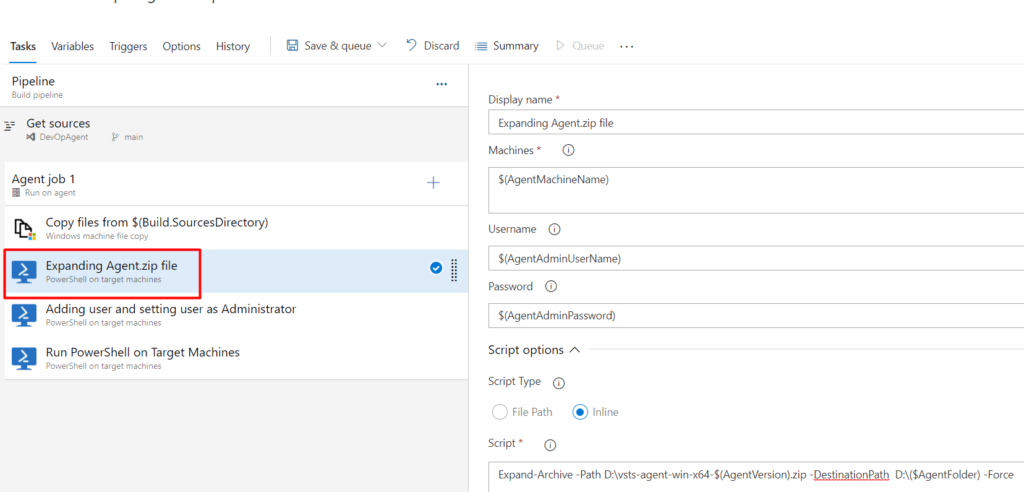
Step 3: Then all we need is a couple of Powershell Tasks. Let us add 3 powershell tasks where the powershell commands would be executed on the remote machines/ The 1st powershell task will extract the agent zip file and copy it to a directory which will be our agent folder.
Expand-Archive -Path D:\vsts-agent-win-x64-$(AgentVersion).zip -DestinationPath D:\($AgentFolder) -Force

Step 5: Then the next step is to add our user as an Administrator in case if you want this agent to be running as an interactive agent then you may need to setup this agent with autologin credentials which can be used here. For that I am going to use the same powershell task but going to execute the below command
try{ Set-LocalUser -Name $(AgentUserName) -Password $(AgentePassword)}
catch { "User already present" }
try { Add-LocalGroupMember -Group Administrators -Member -$(AgentUserName)}
catch { "User already Added as Administrator"  }
Step 6: The next powershell task is run the config.cmd which will do the agent setup automatically without asking us for any prompt. (There are many ways in which we can setup an interactive agent and instead of typing the commands one by one we can set it up by just giving different parameters without config.cmd prompting us for input
cd D:\$(AgentFolder)
.\config.cmd --unattended --url $(AgentOrg) --auth pat --token $(AgentPATToken) --pool $(AgentPool) --agent $(MachineName)$(AgentUserName) --runAsAutoLogon --windowsLogonAccount $(AgentUserName) --windowsLogonPassword $(AgentPassword) --overwriteautologon
The above powershell command can be even used in normal scenarios where you just need to setup an agent after logging into the machine. The above command will setup an interactive agent that can be used for Automation & Performance testing apart from the normal CI/CD Process. In case if you want the agent to be run as a service then you can even use a different command to run the agent as a service.
